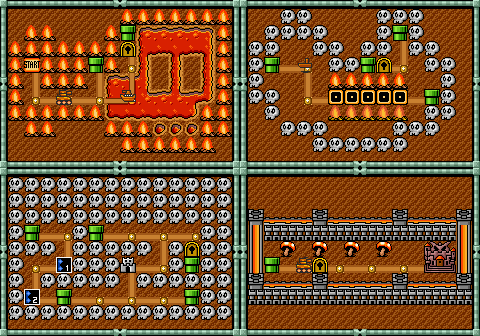
World 8 Airships (Bowser's Airforce)
If you've been saving your P-Wings for a rainy day, consider the airship stage a downpour. These mini-airships are the fighter planes of the Koopa's Air Force. They move faster than the Koopaling's Airships, so the screen scrolls at top speed.

- 1: A Raccoon or Tanooki Suit can give you the edge you'll need to pass the challenging Airship stage.
- 2: As you're jumping between platforms at point 2, land directly on Rocky Wrenches to cast them off the side of the ship, as this will keep stray wrenches from hitting you at an awkward time. Never land on a Rocky Wrench when he's just about to throw a wrench of he'll tag you with it.
- 3: It's best to stand on the rocket when you're jumping from ship to ship. Leap high, then use your tail to float across the wide gap. If you don't have a Raccoon Suit, it's a difficult jump.


- 4: Avoid Rocket Engines and flying wrenches as you hop from the final platforms. You'll need the Raccoon Suit to glide the long distances between platforms. If you're having trouble and have several P-Wings stored in your inventory, use one to pass this stage easily.
- B: As you'd expect for an airship captain, BOOM-BOOM will sprout wings after you stomp on him the first time.
In Super Mario Advance 4, this level was shortened, with the removal of the first two tanks after the ? Block.
World 8-1
You'll be as green as the scenery when you see how many cannons are aimed at you. After all that military hardware Bowser threw at you, you'll be glad to see a normal world. But this stage is extremely tough to complete unless you're Raccoon Mario!
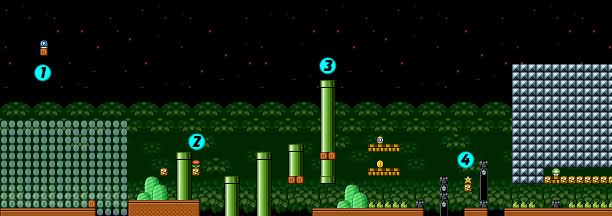
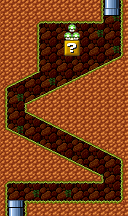
- 1: Raccoon Mario can easily fly at the start. Go straight up to Switch Block at the beginning of the stage to cash in on a cache of glittering silver coins.
- 2: Knock the power-up out of the ? Block and be careful when you try to collect it. Note: In the GBA version, a Note Block has been added to the right of the platform. Use the Jump Block to bounce up, but don't leap into a set of fireballs from the Venus Fire Trap.
- 3: Use the flat stretch at the start to build your P-Meter and fly to the top of the sky pipe to the right. Inside (shown right), there's a ? Block loaded with three 1-Ups. If you like, you can charge up your P-Meter, exit the room, and fly to the end of the stage.
- 4: The Starman inside the ? Block at point 4 will allow you to power through Bullet Bills without a worry. Don't get knocked out by a Bullet Bill in the process, or it won't be worth it.

- 5: Jump at point 5 to find an Invisible Block. Use the newly discovered block as a safe haven and escape route out of the cannon trap Bowser so skillfully constructed.
- 6: Get a running start and hop onto the Jump Block to propel yourself across the wide gap. If you're wearing the Raccoon Suit, use the tail to control your descent. You don't want to land on a Piranha Plant! If you're not Raccoon Mario, it might not be a bad idea to stomp the Koopa and carry his shell to use it as a shield against the plant.
World 8-2
The Angry Sun is angry—angry enough to attack Mario in the dead of night! This world, like all of Bowser's underworld, is tough. But, there is a secret passage (to beat all secret passages) that will take you through to almost the end of the stage.
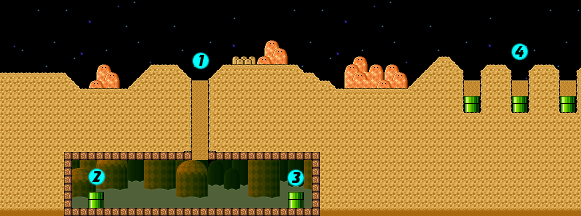
- 1: Relax and allow yourself to sink into the quicksand. In a secret chamber below, you'll find two useful warp pipes.
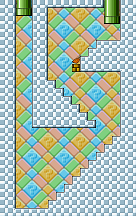
- 2: Take the left pipe to fall to the bottom of a room (shown left) that contains a power-up. If you're Super Mario, you can grab a Super Leaf. Exit through a pipe at the top of the room to warp to the fresh air above.
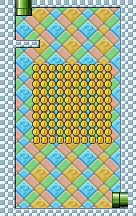
- 3: If you're already Raccoon Mario, take the right pipe instead. You'll plummet through a cloud of coins (shown right). Enter the pipe at the bottom of the room to skip to near the end of the stage.
- 4: Hop over the Venus Fire Traps that have made a home of the desert quicksand. The fireballs they shoot can blast you out of the sky, so watch yourself.
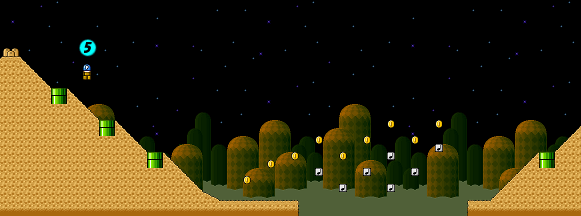
- 5: As you make your way down the slope, pound the Switch Block. As soon as you've hit it, sprint to the bottom of the hill. Instead of using the Jump Blocks, hop on the newly formed blocks above them. It will make evading The Angry Sun a bit easier. The block will turn back into coins before you can make it all the way across. Use the Jump Blocks to finish crossing.
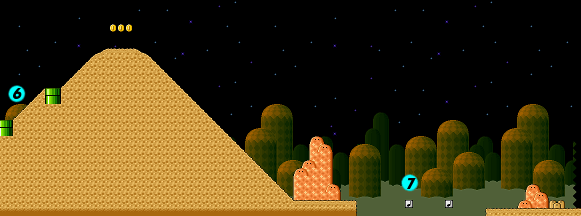
- 6: When you come out of this pipe from the secret rooms, you'll be surrounded by Piranha Plant fire. If you jump up as they fire, they'll aim high and you can run by when they retreat.
- 7: Use the Jump Blocks to cross the gap separating you from the end of the stage. In an emergency, land on the Koopa Paratroopa if you can't quite make it to the Jump Block. Don't forget about the Angry Sun—it will continue to pursue you with a vengeance.
World 8 Fortress
The finest traps, the most brutal enemies and a masterful maze guard a dreary fortress. If you thought the other Fortresses were tough, wait until you get a load of this one. The pinnacle of Bowser's crafty engineering, this Fortress will boggle your mind with its two sides and multiple traps. Explore thoroughly…
Front side

- 1: Enter the first door to reach a room containing a power-up. Hit the ? Block from the bottom right to make the power-up slide to the left (and away from the lava). If it's a Super Leaf, it will float down slowly.
- 2: If you're desperate for 1-Ups, here's a crafty one to find. Jump to the right of the door to find an Invisible Block. Use it to reach the Switch Block, stomp it, then enter the door under the "H". There will be a secret door on the platform to the right of the conveyor. Go through the white door to reach the room with a 1-Up.
- 3: This Thwomp will trap you in this area by the door, blocking your access to the ? Block above. Trigger the Thwomp Trap to move it left, then go under the doorway and hit the block containing a 1-Up from the bottom right. It'll slide to the left, so grab it when it's safe to do so.

- 4: Hit the Switch Block, then run left to the white doorway and enter it before it disappears. Then go down and left through the door. You'll see three blocks to the left; bump the last of the blocks from the bottom left to pick up a 1-Up.
- 5: Activate this Switch Block and a door will appear on the conveyor belt. It leads to a room with a ? Block that contains a Fire Flower. If you'd rather have a Super Leaf, go through the lower door and head left.
Back side

- 6: Fall down the pit below the door. If you fall through this door as Small Mario, you may think there's no way you can get to that lone ? Block. However, you can jump to reveal a series of Invisible Blocks that will fill the area beneath the door. Run across the gaps to the right if you're small Mario and make it past the Thwomp. If you're Super Mario, just bust your way through the blocks to the left. Then make your way to the door above.
- 7: Use the maze of doors to your advantage! When you enter a door, all of the blocks will reset. Collect the power-up at point 7, then enter the door below it and come right back to find the power-up replenished. Just don't go for it unless the Thwomp is resetting. You'll be powered up in no time.

- 8: Any attempt to jump through the gap at point 8 will reveal an Invisible Block. Carefully jump and hit only the block on the right side of the gap. After the 1-Up appears and falls down the gap, grab it, then jump to hit the remaining two Invisible Blocks.
- 9: With all these secret doors, you might have guessed that the exit is also hidden. Move right on the conveyor belt. Your proximity should spring the Thwomp Trap, so wait for it to get out of the way, then fall to the floor. Jump over the trap, move left, and hit the block to reveal a Switch Block. Get back up, hit the Switch Block, skip the door on the conveyor belt, and enter the white door to the right—It leads to BOOM-BOOM's hidden chambers.
Boss room

- B: Once you enter this area, squat under the spikes to reach the boss. Expect a tough battle with Boom-Boom on a moving conveyor belt. Don't let yourself get pushed into him.
World 8 Super Tanks (Bowser's Army)
A titanic, rolling juggernaut of a tank is all that remains of Bowser's once-great army. This train of cannons and Bob-ombs manned by six of Bowser's crack Rocky Wrenches is the only thing preventing Mario from entering Bowser's Castle! The Princess is waiting for you!!!

- 1: Don't panic—things will begin flying fast and furious right here, at the front of the super tank. Keep cool and hold down B button as you jump.
- 2: It's raining wrenches. A row of Rocky Wrench crewmen wait to throw their tools at you at various heights. Do anything you can to avoid the storm of steel they fling. Avoid jumping if possible; you might lose control.


- 3: Although it's not totally safe (no place on the tank is), your best bet is to stay on the right side of the screen. Don't go to the very edge though.
- 4: You're almost there! Take it slow now. Don't do anything rash. Just let these cannons fire and then get on their barrels. Next stop: BOOM-BOOM and then the Castle of Koopa!
- B: The tail end of the Super Tank is the setting for the final showdown with Bowser's henchman, BOOM-BOOM.


