Finally, you've come to Wart's twisting castle, the source of all the evil in the World of Dreams. Now is the time to show your strength! The final world is long, complicated and tricky. It's filled with many of the obstacles from the earlier worlds, plus some new and unusual challenges. Conveyor belts, spikes, chains, and two separate paths to the final boss, Wart, are just some of the tough trials you'll have to overcome.

Balanced character selection
This stage is a huge maze of challenging rooms, chains, conveyor belts, and some very tall ladders. While it has some challenging jumps, jumping high isn't as important as an ability to jump far. You may have underestimated her in the past, but be prepared to change your tune about the Princess Peach. You will be grateful not only for her ability to pinpoint her landings, but also to float over the conveyor belts. And her Wart-fighting skills are top notch.
Start Area
Two ways
In map B, you can go up or down. If you decide to head for the heights, follow the Upper Path. If you go down, read the Lower Path. It really doesn't matter since you can enter Sub-space from either path and obtain at least one all-important Mushroom. You can also move to the Final Area either way. Since you can move freely between each path and area, it's a good idea to increase your character's life meter to four before you go on to meet Wart. It's not a requirement, but it will help. In Super Mario Advance, you will have to explore both paths if you wish to collect all five red Ace coins.

Peachy keen. Use the Princess' floating ability to traverse the cloud-like platforms. Pick up one Snifit and throw it into another to remove the bullet projectile threat in the area, stay keen and see the grass below that one Ninji, as it has a 1-up as a root.
Map B
Part 1

(1) A moving floor. When you walk into the castle, the floor starts moving. You've got to keep your footing and, worse yet, battle bad guys. The blocks that descend from the ceiling keep you from relying on the Princess' ability to float past the danger. Take your time and keep moving.
Part 2

(2) Run and jump. Not only does Panser spit flames at you, but the floor keeps right on moving. A hero could get hurt like this. Make small jumps and move ahead steadily. If you're using the Princess, make a running leap off the top conveyor belt and float over the flames if you can.
Choose your path. From here, you must make a choice. If you climb down the chain in the earlier portion of map B, you will embark on the Lower Path. If you proceed all the way to the right and climb up the chain at the end, you will be following the Upper Path.
Upper Path
The Upper Path is shorter than the Lower Path, but it comes at the cost of having virtually no assistance as you travel through it. There are no objects to use to throw at enemies, nor are there any cherries to collect.
Map C

(6) Get your strength back in the bonus room. After passing through the door at the bottom of map E, you've reached a room with no enemies. This is one of the few places in Wart's castle where you can increase your life meter. The grass on the right holds a Potion. Enter Sub-space and take the Mushroom right away. You can take coins if you like, but you won't need to use them after you beat the game.
Map D


(3) Everything depends on your timing. You can use the chains to escape all those flying Sparks. Jump onto a chain and go from one to the next, timing each jump to avoid passing Sparks. You are always safe from a Spark attack when you are touching a chain. If you have enough life in your meter, you may want to take a chance and rush through this part. Look out for the crowd of Sparks that appear on the platforms above.
(4) Be sure to go left. Chains are hanging on both sides, but if you intend to increase your health, take the one on the left and climb up. If you take the one on the right, you won't be able to get to the door that leads to map E. You will, however, be able to climb to the top and proceed to the Final Area.
(7) The most difficult place! You have to climb up with Sparks circling around you. The slightest hesitation will hurt you since the Sparks are going around fast. This is a tough spot—you can't drop your guard for a second.
Map E

(5) Avoid Panser. You'll open the door from map D and find yourself outside Wart's castle. Is there something underneath you? Press the direction pad to the right when you go down. You can get away quicker if you jump down the stairs. Watch out for Panser's flames when you're climbing. Don't get stuck in a place like this.
Lower Path
The Lower Path is a bit longer than the Upper Path, but you will be able to defend yourself a lot better on the Lower Path. You can pick up and throw objects at Sparks to remove them, and cherries dot the path for opportunities to summon Starman.
Map F

(8) Mushroom Block floors. Pull out the blocks at your feet and keep going down. Protect yourself from those dangerous Sparks by throwing blocks at them and remember to always keep moving. If you pick up the cherries on your way, Starman will come and help you out. And now is the time you could definitely use some help.
Map G

In the World of Dreams, chains are insulators. As you pass through this narrowing hallway, you will have to time your passage between Spark patrols. As long as you stand in front of a chain, you are safe from their attack.
Map H
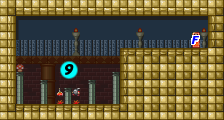
(9) Secret Room. Enter through the center door of map G before you go for the door on the right. You will warp out to a safe room. There you'll find a Potion. Take the Mushroom in Sub-space. This world is full of places where you can get hurt, so it's wise to increase your life meter whenever you have the chance.
Map I

(10) Stay in the center. This place is easier than most. That's because you can escape Spark attacks simply by holding onto the center chain. The cherries on the side might tempt you, but you should just ignore them and keep going—unless you're very very sure of yourself.
Super Mario Advance Mushroom
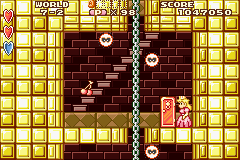
Don't overlook the new patch of grass tucked into the corner of the highest chamber during your ascent up the chain. If you grab it, you'll find a potion. Drop it down where you find it, and step through the door to Sub-space. You'll find a newly added hidden mushroom to boost your health in your fight against Wart.
Map J
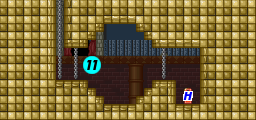
(11) Slip through by a hair's breadth. Inside this narrow little room, Sparks move around and around. You'll find yourself in many predicaments like this in World 7-2. Since you don't have a block to use as a weapon, you'd better run away fast! Watch what the Sparks do and run when the time is right.
Map K

(12) A long climb. You're in another tough spot here. You have to climb up the moving floor and avoid attacks from Shyguy, Snifit, and Spark. You'll have to jump like an acrobat to get through this area. Stay awake, and move up carefully in steady little jumps, and you'll reach the top.
Map L
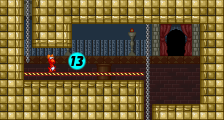
(13) What are you doing, Birdo? Climb up the chain and you'll find Birdo guarding the way to the Final Area. You don't necessarily have to fight her here. Get past her by crouching below or jumping over her.
Final Area
Map M

You're almost there. If you took the Upper Path, you will arrive on the left through door D. If you took the Lower path, you will arrive on the chain to the left of door J. Either way you came, you will need to visit map N before you return here and unlock door J. You can either take door I, or jump up to the conveyor belt on top, and run to the chains on the right.
Map N
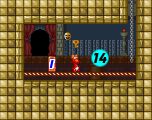

(14) Take the last Key! You can get to this room from map M either by using door I or climbing down the chains on the right. In here, you'll face a red Birdo who is hoarding the key that unlocks the door leading to Wart's room. Defeat Birdo, take her key, open door J in map M, and you will be one step closer to the final challenge. Just watch out for Phanto.
Map O


(15) Hawkmouth gate attack! Here's a room with only two Mushroom Blocks, a Crystal Ball  , and the Hawkmouth gate. Take the crystal as usual, but look out! The Hawkmouth gate is coming toward you. Is this more of Wart's evil magic? Hit it three times with the Mushroom Blocks to make it open its mouth, and then hop in. Hurry before it shakes off being stunned!
Boss: Wart


Wart Removal. Wart, creator of all the monsters in the World of Dreams, and the source of all its evil, awaits you in this room. You've come this far, you can't back down now. This will take all the strength and courage you've got. This guy is sly, wily, strong and full of ways to stop your progress. But you have a few tricks of your own to achieve victory and bring peace to the universe.
Wart will walk back and forth along his platform shooting bubbles that spread out in an arc and fall to the ground. You can stand between the bubbles as they fall to avoid them, which should be your number one priority. The three pipes will pop out vegetables. Catch one, then walk up to the side of Wart's platform. When he opens his mouth, quickly jump up and throw the vegetable at him. If it hits a bubble it will disintegrate, so be sure to get it in before the bubbles appear.
The Princess has an advantage in this fight. If you can anticipate when Wart is about to open his mouth, you can float her up in the air just before and toss the vegetable in his mouth while you're there, instead of having to time your jump perfectly. You can also try sneaking behind Wart to toss the vegetables so that you aren't in the way of the bubbles that flow from his open mouth. It will take six vegetables to give Wart a serious enough case of indigestion, that he'll be forced to give up his conquest of the World of Dreams. Save the Sub Cons!


