Bombs have been set up in order to destroy the dam. You must get into the water and disarm the bombs, but to get to the water you have to go through the dam up to the rooftop.
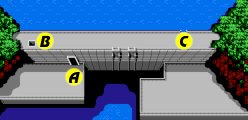
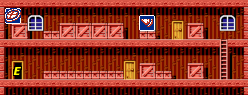
Area map
Plan of Attack
- Head inside the building through door A.
- Fight your way to the top of the dam and hatch B, then dive into the water from point C.
- Navigate underwater to locate and disarm 8 bombs before time is up.
Building A
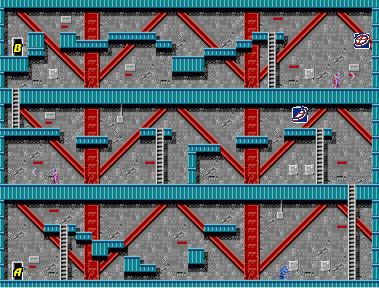
The dam interior has three stories. You will encounter a few minibosses along the way. To the far right of the third story is a full pizza, though you must fight a miniboss to get it. The last jump to reach door B can be difficult. You must be walking forward when you jump in order to cross the gap, it can't be performed from a standstill.
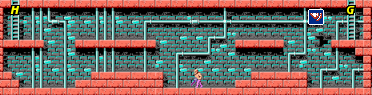
Underwater
After you exit the level, walk to the right until you encounter a break in the railing and take the plunge into the water. Eight bombs are distributed throughout the water. You need to find all of the bombs within 2 minutes and 20 seconds to complete this section. April will tell you how many bombs remain by pressing Start button.
If time runs out, the game will be over no matter how many turtles remain. However, if a turtle loses his life underwater, the next turtle must begin again from the top of the dam, but all of the deactivated bombs remain deactivated, and you get the full 2 minutes and 20 seconds to deactivate the remaining bombs.
Anything that is not water, or a bomb, is harmful to the turtles, including the electric currents, poisonous seaweed, and rotating gears. In addition to avoiding them, you have to contend with a constant water current to the right, which makes swimming to the right rather fast, but swimming to the left quite slow.
Part 1
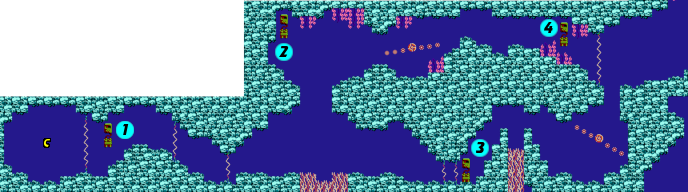
1: After jumping in the water, watch the timing of the large electric current, and then pass it to deactivate the first bomb to the right.
2: Continue to the right, watching out for more electric currents. Avoid the pink coral on the bottom of the screen as it will instantly kill any turtle that touches it. Swim up though the opening in the ceiling and continue to the top to deactivate the second bomb.
3: Return to the bottom, avoiding the coral and the twin electric currents, and swim over to the third bomb.
4: Swim on to the right, climb up above the next stretch of coral. You'll have to contend with a rotating gear, swimming counter clockwise around its center to avoid getting hurt. When the way is clear, swim up to the area above. From there, avoid the electric current to the left and make you way up to the fourth bomb, watching out for the seaweed around it.
Part 2
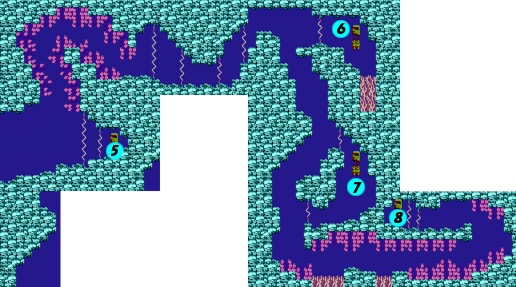
5: From the fourth bomb, swim straight across to the right, passing the open ceiling, and advancing to the twin electric currents. Getting past them both to deactivate the fifth bomb is easy, but swimming against the current to the left makes it difficult to escape unscathed
6: Swim up through the opening to the left. This next section is considered one of the most difficult in Area 2. You must swim through a large bed of poison seaweed. A very narrow path offers the only safety. It's extremely difficult to swim through the seaweed and not receive any damage. Do your best, and switch turtles if it appears that any are in danger of dying. Once you make it through, you must carefully swim to the right to pass through a series of electric currents and on to the sixth bomb positioned above deadly coral.
7: From the sixth bomb, fight the current and swim back to the left and down through the opening to the section below. Pass the small electric current to reach the seventh bomb just beyond.
8: You can either choose to swim back through the current you just passed and down, or swim down first and pass left through a different current. They both pose the same challenge. Either way, float down to the bottom, where you must swim through a straight but very narrow path between seaweed and coral to the right. Upon reaching the far right side, you must swim up and back to the left. Two more electric currents stand between you and the eighth and final bomb.
If you successfully deactivate all eight bombs in time, April will congratulate you, and you will return home for much deserved rest. However, instead of finding rest, the turtles find their lair ransacked. The TV pops on and a video message from Shredder informs the turtles that their master Splinter has been kidnapped. To get him back, the turtles must defeat the Foot Clan.
Building E
This building is optional. It contains a slice of pizza, as well as an entire pizza, but you'll have to fight your way through narrow passages to get them. In all honesty, the pizzas are not worth the effort, considering you can recharge much more easily by grabbing the slice that appears continuously near manhole G.
Manhole F

There is very little point in visiting the sewer below manhole F. It dead-ends after a long journey to the right. The only nice thing about it is the invincibility icon about half way in, which gives you the ability to crash through all of the enemies, including the frog mid-boss if you get to the very end quickly enough. But then you have to double back and return the way you came.
Manholes G and H
The slice of pizza by the ladder to manhole G is a great way to restore any lost health to the entire team. Pick up the slice for any turtle that needs health, then exit back up the ladder and jump back in again, and the slice will always return. After filling all your turtles up with health, make your way to the left. About half way in, you'll be forced to fight against a chainsaw wielding mid-boss. Use Donatello to take him out, and then continue to the ladder on the left. Climb up through manhole H, and you'll arrive just outside of building I.
Building I
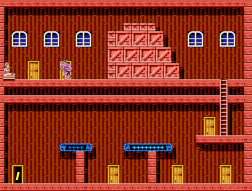
The enemies here are very powerful in the early game, so proceed with caution.
You'll enter on the first floor of this building, and you must make your way to the right. Many flying creatures will move back and forth above the conveyor belts. You can use Donatello's staff to try to remove some of them before jumping up to the first conveyor belt. More flying creatures will appear as you continue, and a robot guards the floor between the two conveyor belts. As you cross the second belt, it's possible to leap over to the platform with the ladder in order to avoid fighting with the two boomerang henchmen that try to stop you.
Climb up the ladder, where you'll encounter another boomerang henchman and two flying creatures. Clear them out and them climb up and over the boxes. Walk to the left side of the second floor, and Rocksteady will attempt to ambush you. He likes to charge like Bebop did, but he also resort to shooting at you with his gun. Once again, Donatello has a big advantage against Rocksteady over the other turtles, so he's a good pick to knock Rocksteady out. It's even possible to hang out on top of the boxes where Rocksteady can't hurt you, and continuously strike downward at him until he is defeated.
Upon beating Rocksteady, you will go an untie April, who warns you that Shredder is trying to blow up the dam.